After finishing the CanSat Shield board you need to test it to make sure that all of the components are working properly. The following steps will guide you through the test procedure:
- Install the Shield board on top of Arduino Uno (Make sure the power is disconnected before mounting the Shield board).
- Power up the CanSat by connecting the battery.
There is a green light on the Arduino Uno labelled “ON”. This should always be illuminated when the Arduino Uno is powered on.
If you fail to get the power light on, test your battery and also make sure there are no short circuits on the Shield board. - Disconnect the battery, then connect the USB cable and check the “ON” light again.
- Open a new Arduino Sketch and delete the lines already there. You are going to insert new content in a few moments.
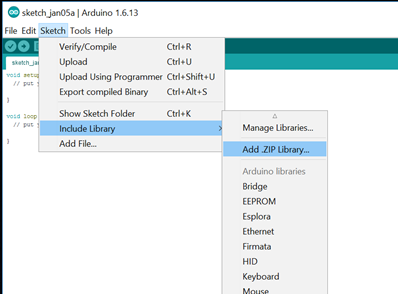
- To be able to use digital sensors, you need to install a library, that includes all the information, the Arduino program needs to know about your specific digital sensor. For analogue sensors like the ntc this is not nescessary. The library written for the GY-91 sensor used in the version 6.2 CanSat kit can be found here: GY91 as a zipped file. To include this zipped library in your Arduino Program, see the figure to the right. If you are using another GY-sensor, you need to install the library for that specific sensor, and not the GY-91-library.
- Insert code text from this link: Gy-91 first_sketch in your empty Arduino sketch. Name this new sketch «FirstCanSat6_2sketch.ino». Or if already done so: open the sketch file “FirstCanSat6_2sketch.ino” in the Arduino IDE (1.0 or later version) and upload the sketch to the Arduino Uno board. This is a test program designed to give you measurements from all the sensors on the version 6.2 CanSat kit. (If you have problems uploading, check that the board and port settings in the Arduino (tools fane) are correct.)
- Start the “Serial Monitor” in the Arduino IDE.
- You should get some data similar to what you see in the illustration below. Read the description given under the illustration.
- Test all the sensors by trying to manipulate the sensors. Do you get response from all the sensors?
- If you have got data from all the sensors and they seem to work fine, the testing of the main functionality is done. The radio and data logger will be tested at a later point in this manual.
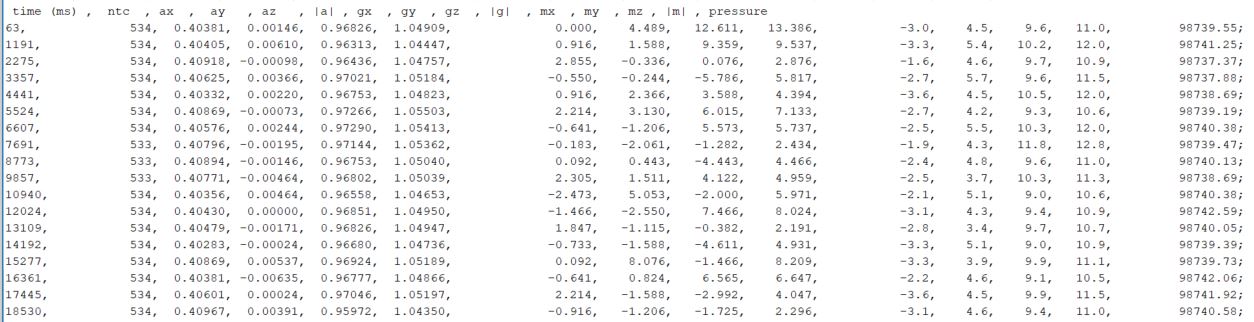
Description of the measured output data as seen in the above figure. From left to right:
First line is text and refers to the measured parameters in the subsequent coloumns:
| time (ms) | This is the time in miliseconds since the CanSat was turned on or have been reset. |
| ntc | Shows data from the NTC temperature sensor. The data is 10 bit digital data from the Arduino and will be an integer from 0 (equivalent to an analogue output voltage of 0V) to 1023 (equivalent to an analogue output voltage of Vcc (5V)). |
| ax, ay, az, |a| | Show data from the accelerometer. This sensor will give you 3 readings, one for each axis (x, y and z) and in addition, the total acceleration is given as |a|. All measured in units of g’s. When the sensor is laying on a horizontal surface, the ax and ay will be approximately 0 and the az will be approximately 1. |
| gx, gy, gz |g| | Show data from the gyroscope. This sensor will give you 3 readings, one for each axis (x, y and z) and in addition, a number indicating the total number of degrees per second is given as |g|. All measured in units of degrees per second. |
| mx, my, mz, |m| | Show data from the magnetometer. This sensor will give you 3 readings, one for each axis (x, y and z) and in addition, the total magnetic field strength is given as |m|. All measured in units of μT. |
| pressure | Shows data from the pressure sensor (BMP280). The pressure is measured in hPa. |
Note: The sensors may have some deviations from the actual conditions caused by offset in the sensors. There is a section on how in general to calibrate sensors here.